Package building example: Adobe Reader
This article is a step-by-step tutorial about building a very basic installation package which installs Adobe Reader.
Step 1 of 8: Download the installer
Download the installer of Adobe Reader from: http://get.adobe.com/fi/reader/enterprise/ (Please read the download page carefully!)
At the time of writing this example, the document file name is: AdbeRdr11006_en_US.exe. Notice that the name depends on the latest version and selected localization.
From the download page, you can find out a link to documentation for enterprise deployment:
Enterprise Administration Guide: http://www.adobe.com/devnet-docs/acrobatetk/index.html
From the Enterprise Administration Guide, you can find that Adobe has a customization wizard (CustWiz11003_en_US.exe) ftp://ftp.adobe.com/pub/adobe/acrobat/win/11.x/11.0.00/misc/
For Reader DC version use this link instead: ftp://ftp.adobe.com/pub/adobe/acrobat/win/AcrobatDC/misc/ (CustWiz1502020039_en_US_DC.exe)
Download & Install it.
Step 2 of 8: Customize installation
When you read the Enterprise Administration Guide further, you can find out that you must extract the contents of the executable (AdbeRdr11006_en_US.exe) before the customization wizard can be used: http://www.adobe.com/devnet-docs/acrobatetk/tools/Wizard/basics.html#starting-a-project
As advised in the documentation, extract the package with the following command:
AdbeRdr11006_en_US.exe -nos_o"c:\temp\package\extracted" -nos_ne
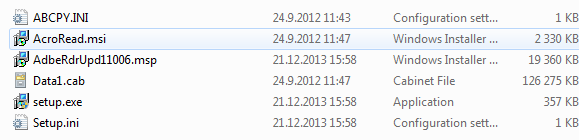
In this example, the package will be extracted to the "C:\temp\package\extracted" folder and it should now have the following files:
Run the Adobe Customization Wizard.
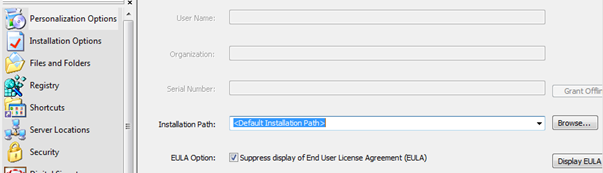
Go to "File > Open package" and browse to "C:\temp\package\extracted" and open the AcroRead.msi.
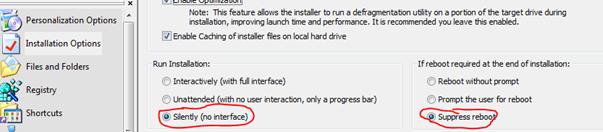
After this, you can make customizations as you wish. In this example, we make two customizations:
Suppress display of End User License Agreement.
Select that the installation should be done silently and suppress reboot (you should do at least the latter)
You can now save the package and close the Adobe Customization Wizard.
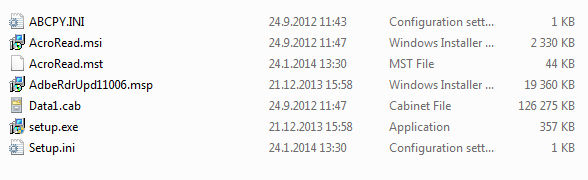
"C:\temp\package\extracted" should now have one new file (AcroRead.mst) and Setup.ini has been modified:
If we now would run the setup.exe, it should silently install Adobe Reader XI to the computer.
Step 3 of 8: Create a Managed software item
If you don't yet have a Managed software item created for this software, you can create it in the "Operations > Software management > Managed software view" in the user interface of Miradore Management Suite. If you already have the Managed software item created, ensure that the value of the "Enable package building" field is "Yes".
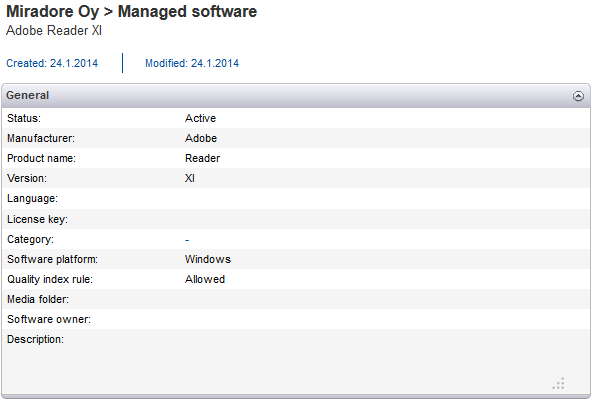
Software identification and Software usage settings are optional on the scope of package building example, but feel free to enable those as per need basis.
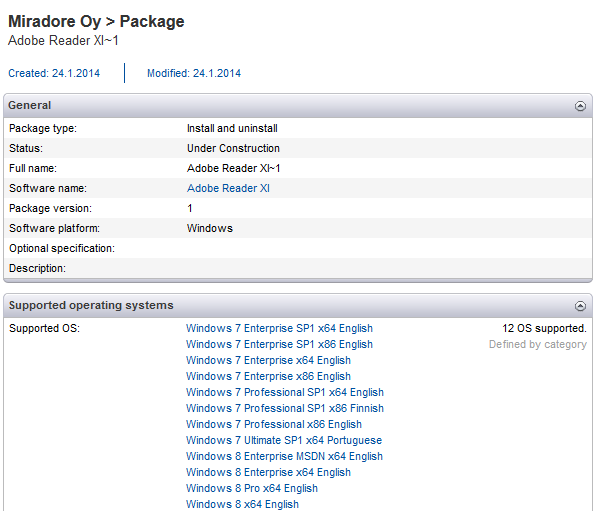
Step 4 of 8: Create a Package item
Next, we will create a package that contains the "instructions on what and how to distribute".
Create a new Package item from the "Operations > Software management > Packages view" and define at least the required settings.
Also set the "Media folder". It is recommended to use the default value which would be "%MDR_InstPoint%\Software\Adobe\Reader\XI" in this case. Write this path down for you, because we will need to copy the customized installer files there next.
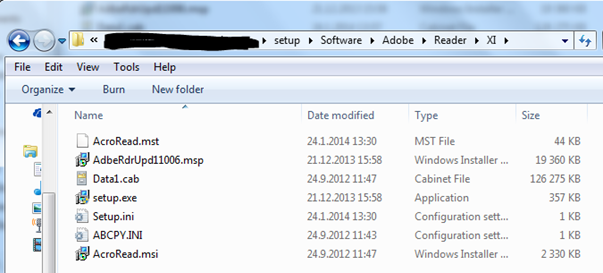
Step 5 of 8: Copy the customized installer files to the master installation point
Copy the files from the "C:\temp\package\extracted" directory to the master installation point. You can use Windows remote desktop connection, file share etc.
By default, when Miradore Management Suite server is installed, it will create an installation point to: "C:\Program Files (x86)\Miradore\Server\<instancename>\setup". This installation point should also be automatically shared with name "setup$<instancename>" so you should be able to access it with: UNC \\<server>\setup$<instancename>.
At the installation point, you should create a folder structure similar to what we have in the "Media folder". So, looking from the server, the folder should be:
C:\Program Files (x86)\Miradore\Server\<instancename>\setup\Software\Adobe\Reader\XI
After you have copied the files, the installation point should look like this:
Step 6 of 8: Define package actions
Go back to the user interface of Miradore Management Suite, and open the "Adobe Reader XI~1" package item again. On the Package item page, go to the "Package editor for Windows" tab.
Switch into Edit mode and edit the actions by adding one "Execute" action that will run the setup.exe. After that, save the changes.
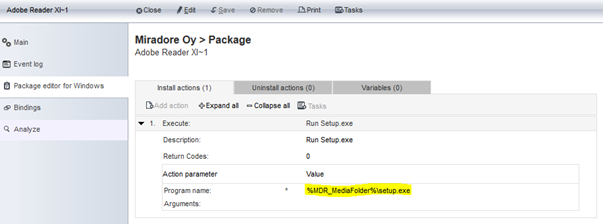
Alternative: We could also use the "Install MSI" package action and run the AcroRead.msi directly. In this action we should also point to the transform file AcroRead.mst.
Step 7 of 8: Testing the package
Now, you should have a computer that you can use for testing the package at hand. It would be nice to have a dedicated testing computer or a virtual machine. Virtual machines are actually very good for this purpose because they can be easily restored to the "pre-package" state after the testing.
Navigate to the "Asset configurations by name view" in Miradore Management Suite, and open the asset configuration item of the test computer.
On the Asset configuration item page, select "Tasks > Package distribution > Test package" and select the "Adobe Reader XI~1" package from the list to try the installation.
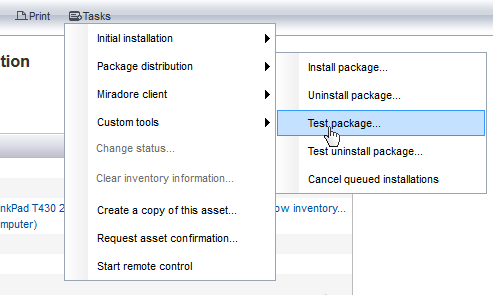
The package should still be in status "Under construction". The package appears into the "Tasks > Package distribution > Install" package menu when it is in active status.
Follow-up the test installation from the Asset configuration item's "Events > Distribution status" tab.
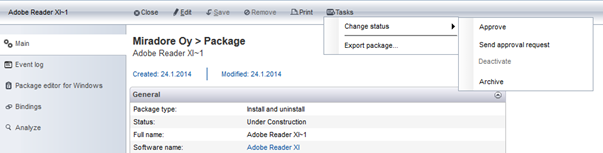
After you have confirmed that the installation was successful, you should then activate the package by choosing "Tasks > Change status > Activate". After that, the package is ready for use.
Step 8 of 8: Troubleshooting
If the package never completes, the installation fails with error message or something similar, the typical troubleshooting tasks are:
Check all paths and file names. Typing errors are common cause of errors.
In case of error, check the error code explanation.
In the package main page, change the setting "Interacts with desktop" to "Yes" and try the installation again. This setting allows the installation program to show error messages on the screen of your test computer.
For more information, see Troubleshooting package distributions.
Related to
See also