SNMP Scanner
Miradore SNMP scanner is able to gather information about such network devices which already have an asset in Miradore Management Suite. The SNMP scanner sends the data to Miradore server, where it is used to display inventory information, generate reports and quality indexes.
It is possible to install as many scanners into the environment as needed. Distributed network architecture allows load and network traffic to be divided into smaller pieces (scanning done over LANs and not over WAN). Each scanner has its own target devices list to scan. Each scanner server’s target devices can be defined based on SNMP scanner scopes. A scanner scope consists of three factors (Location, operating system and hardware category) and SNMP community name that is used to authenticate devices under the scope if the device specific community name is not set via device configuration.
Requirements
-
Install SNMP scanner on a Windows machine with .NET framework 4.7.2
-
Correct SSL certificate must be available in the machine's Windows certificate store if HTTPS connection method is enabled from Miradore system settings
-
Create an SNMP scanner item through Miradore system settings
-
SNMP scanner requires an authorized connection to the Miradore database server
-
Enable SNMP scan for the target devices through the asset pages
-
The target devices must have an asset configuration item in Miradore Management Suite
Step-by-step guide for setting up SNMP scanner
-
Install SNMP scanner by following the instructions given in Installation using Windows installer.
-
After installation, configure the SNMP scanner as described in How to configure Miradore SNMP scanner.
-
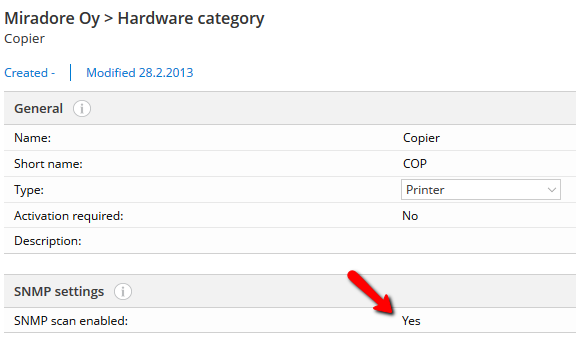
Enable "SNMP scan enabled" setting for the hardware categories that you are going to scan.
-
Navigate to Assets by name view and use the view tools to create assets for the devices that you want to scan with the SNMP scanner. Notice that the asset model must belong to one of those hardware categories that have the "SNMP scan" setting enabled.
-
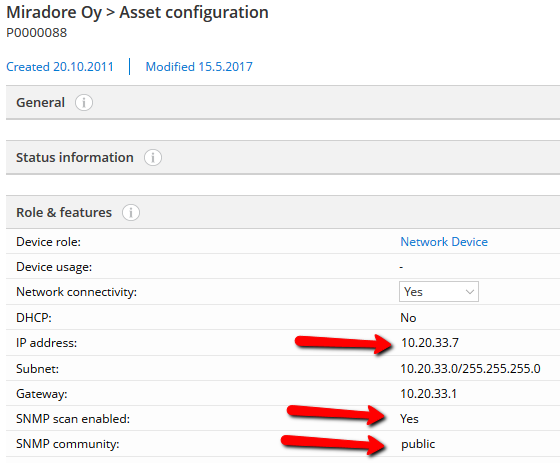
Check this page for field descriptions and make the following configurations for the created Asset configuration items:
-
Set a static IP address
-
Enable SNMP scanning
-
Define the SNMP community
-
Installation using Windows Installer
-
Run 'SNMP_scanner.msi' installer file
-
Set general SNMP scanner connection and authentication settings. Miradore Server host name, instance and port must be provided before Next button can be pressed
-
Miradore server host name: Host name or IP-address of Miradore server. Collected data is sent to this server.
-
Miradore server instance name: Many Miradore servers can run on same host. Instance name specifies the server. By default, server is installed with instance name 'Miradore'.
-
Miradore Server HTTP(S) port: TCP/IP port that Miradore server uses. By default it is 80.
-
Use HTTPS: This option defines protocol (HTTP/HTTPS) that is used when SNMP scanner sends result file to the Miradore server.
-
Ignore SSL errors: If checked, all SSL certificate errors are ignored.
-
Default credentials: If selected, SNMP scanner connects to the Miradore server by using default credentials.
-
User name and password: If selected, SNMP scanner uses specific user name, domain and password to connect to the Miradore server.
-
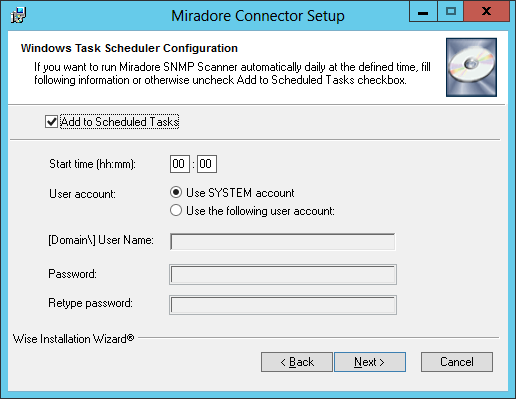
 Set Windows Task Scheduler configurations
-
Add to Scheduled Tasks checkbox: if checked, Miradore SNMP scanner task is added to Windows Scheduled Task and all fields must be filled before Next button can be pressed
-
Start time: Connector is run daily at this time.
-
User account: Select to use SYSTEM account or give a user name and a password that is used to run the task.
-
Note: If the task scheduler account does not have access to Miradore, a user account must be defined. See How to authenticate SNMP scanner from the end of this page.
-
-
[Domain\] User Name: Scheduler will run task as it was started by this user. Add domain if needed.
-
Password and Retype password: User’s password. Passwords must match.
-
-
Set destination folder where Miradore SNMP scanner will be installed.
-
Authorize connector, see Connector authorization
-
Start installation.
How to configure Miradore SNMP scanner?
-
Go to System settings > Connectors > connectors in Miradore.
-
Press 'Add...' at the bottom left corner of the SNMP scanners table. You can also run connector once to get basic information of SNMP scanner device to Miradore.
-
Enter name of the SNMP scanner server and optional description.
-
Note: Server name must be same as the hostname of the computer which will be the SNMP scanner server.
-
-
Define SNMP scanner specific scopes.
-
Scope defines what devices specific scanner should scan
-
For more information about SNMP scanner scopes look below at: 'How to define scopes for SNMP scanner?'
-
How to define scopes for SNMP scanner?
SNMP scanners can each have many scopes. Based on OS family, HW category and location, you can define what SNMP devices each scanner should scan.
-
Create a new scanner (see above) or open a existing SNMP scanner from System Settings > Connectors by clicking on the scanner server name
-
Press 'Add...' at the bottom left corner of 'SNMP scanner scopes'
-
Form must be in edit mode
-
-
Define scope and community name
Notice: It is a good idea to have a generic "OS = ALL, HW = ALL, location = ALL" scope for one scanner in the environment. This way all SNMP devices should have a dedicated scanner.
Example
The following picture shows two scanners, Server1 and server2. Server1 has 2 scopes and server2 only one.
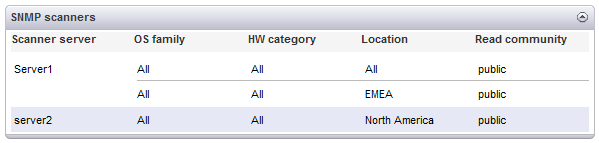
Notice that Server1's first scope does not limit anything. In practice in this example all devices that are not under 'North America' location would be scanned by Server1.
Additional info
![]()
![]() MSI Installer parameters
MSI Installer parameters
|
Following SNMP scan specific parameters can be given to installer from command line.
|
![]()
![]() How to authenticate SNMP scanner
How to authenticate SNMP scanner
SNMP Scanner connects to Miradore server's IIS Web Service application. The scanner is a Windows Scheduled task which is run by SYSTEM user account by default. When SNMP scanner is installed on the same computer as Miradore instance, the scanner is able to access the service with the SYSTEM account. If the SNMP scanner is installed on another computer than Miradore server, separate user account is required.
The user must exist before installing the SNMP scanner. If the SNMP scanner has been already installed, it needs to be uninstalled and installed again to enter the correct credentials in the installation wizard.
The user account can be either local or domain account. The user needs to have read and write access to the following directory in the Miradore server:
<Miradore installation directory>\App\WS
See also