Please read this document carefully before Miradore upgrade and use it as a guide to complete the upgrade.
It is important that you read the instructions entirely before the upgrade, especially if you are using patch management in your environment, because the upgrade will require manual actions.
If you do not use the patch management, then you can upgrade your Miradore environment normally by running the upgrade installation on your Miradore server.
Miradore 5.4.0 contains a major upgrade to the Patch Management as we have replaced the previously used patch catalog and scanner components with more advanced technology. Below, we explain the benefits of these changes and what are the steps to upgrade your environment. Follow this guidance always if you upgrade your environment from Miradore Management Suite 5.3.0 or earlier version to Miradore Management Suite 5.5.0 (or higher).
New patch library supports more software products and gets more frequent updates. See all supported products from Security patch products view.
Patch inventory scan now takes seconds rather than minutes which improves user experience and speeds up the patching process.
Thanks to quicker patch scans, more time is spared for patch installations during each maintenance window.
Devices can now be configured to download patch files before the maintenance window.
Patching status is now more clearly reported for each device in patch management views and also on the asset page. See Monitoring patch installations for more.
Patch scan and deployment can now be set to take place automatically at the end of the initial installation. See Software patching during initial installation for more.
Patching can be now temporarily disabled through the asset page.
Reserve enough time for the upgrade. We do not recommend upgrading your environment if you have urgent patching needs during this or the next week.
If you have built any patch-management-related API integrations, we recommend you to start planning the integration check-up before the upgrade.
The upgrade will:
Erase all patch approvals in your Miradore environment.
Erase old patch files from your installation points.
Bring changes to Miradore API, report builder, and dashboards. Therefore, any patch management related integrations, quality index indicators and reports, report builder reports, and dashboard widgets must be checked and possibly re-configured.
Discontinue the support of patching Windows XP or Vista systems.
Disable automation tasks containing report builder reports which are no more supported.
Notice that Miradore installer will generate three xml files in "C:\Windows\Temp\Miradore" directory. The files contain information about the patch approvals, patch approval rules and report builder reports that existed in your Miradore instance before the upgrade. You can utilize these files when you re-create patch approval rules and patch management reports to your Miradore environment after the upgrade.
Download the installer of Miradore 5.4.0 or higher.
Use the installer to upgrade the Miradore server and patch manager.
Ensure all installation points get upgraded. You can upgrade the media master installation point with the installer.
Log in to the upgraded environment. The new patch manager runs automatically soon after the upgrade. After that, you should see patch data in the Administration > Feature settings > Patch management > Security patches view.
Check the system settings for patch management. We recommend reading the field descriptions from the Product Guide since the configuration options have changed since the last version.
Make sure that the scheduled task responsible for patch scanning is enabled in: System settings > Clients > General > Built-in scheduled tasks > Windows > Patch scan and install.
You will start to receive data about the patching status of your computers when the patch scanner runs at the managed devices. You can see this information in Operations > Security management > Security patch status view.
At this point, you don't have any patches approved for deployment. Re-create the automatic patch approval rules or approve patches manually according to the Product Guide.
If you approve a lot of patches at once, it may take some time until Miradore has cached and replicated the needed patch installation media to the media master and child installation points.
Miradore Clients will shortly start installing the patches according to the installation schedules and maintenance windows configured in your environment. Follow-up the patching from the Security patch status view ensuring everything goes as planned.
Remember to check and fix the quality index reports, report builder reports. dashboards, and automation tasks which were possibly affected by the upgrade. Below, we have shared some tips on how to find the affected items.
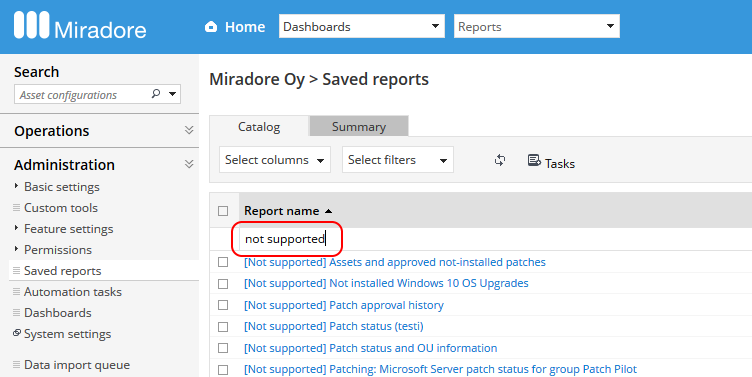
For a list of report builder reports that are no more supported after the upgrade, go to the Administration > Saved reports view, and define "not supported" filter for the "Report name" column. The listed reports should be removed and re-created.
Dashboard widgets, which are no more supported, have been replaced with the text "...widget was removed due to incompatibility issues with Miradore 5.4.0".
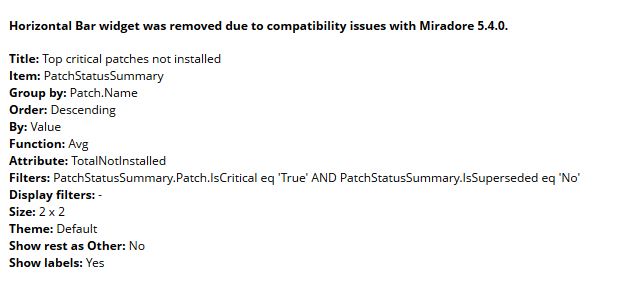
Delete the unsupported widgets and re-create them. See Editing custom widgets for instructions. Some dashboard widgets show historical data. You can find instructions to re-create these widgets from the article Creating a dashboard to display historical data.
The upgrade does not affect the existing maintenance windows configured before the upgrade.
Dashboards or quality index reports, containing patch management data, cannot be successfully copied from Miradore 5.3.0 or earlier environments to Miradore 5.4.0 (or higher) environments using the export/import feature.