WithSecure Elements Endpoint Protection
This connector is used for importing antivirus and firewall information from WithSecure's (previously F-Secure) cloud-based security solution WithSecure Elements Endpoint Protection (EPP) to Miradore Management Suite.
In Miradore Management Suite, the imported information is attached to asset configuration items. You can find device specific data under the "Inventory report > Security" tab on the Asset configuration item, whereas the Antivirus connector view shows you all data that is imported to Miradore Management Suite using any of the Miradore's antivirus connectors.
The imported inventory data is also available through the web service API and in the Report builder under the Asset configuration item's "InvAntivirus" and "InvFirewall" extensions.
Requirements
-
The computer hosting the connector must have a 64-bit operating system installed
-
The computer hosting the connector must have .NET framework 4.7.2 or newer installed
-
Client credentials to use Elements API are required. Every EPP administrator with Security Management rights and permission to modify computes and server settings can initialize client credentials in WithSecure Elements portal.
-
Correct SSL certificate must be available in connector host computers Windows certificate store if HTTPS connection method is enabled from Miradore system settings
-
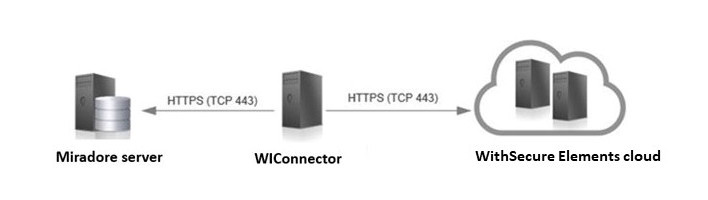
Required network ports are depicted in the following picture
Network architecture
Step-by-step guide for setting up WithSecure Elements connector
-
Install the connector as described in the Installation using Windows installer paragraph below.
-
After installation, run the connector. To do this, open Scheduled Tasks on the connector host, right-click on "Miradore connector for WithSecure Elements" -task and click "Run".
-
After the first run, WithSecure Elements Endpoint Protection connector registers itself into your Miradore Management Suite instance and creates a WithSecure Elements connector item, which appears into the "Connectors" table under "Administration > System settings > Connectors".
-
Check that the WithSecure Elements connector item exists. If the connector item is not created, the connector has not been able to connect to your Miradore Management Suite instance. In this case, you can try to find a reason for the failed connection by checking the connector logs. See Logging at the end of this document for more information about that.
-
-
Configure the WithSecure Elements connector.
-
Navigate to "Administration > System settings > Connectors" in Miradore Management Suite, and open the WithSecure Elements connector item by clicking on it.
-
Configure the connector settings. You can check WithSecure Elements connector item attributes document for the field descriptions. Remember also to change the connector status to "Active" and save the changes.
-
-
Run the WithSecure Elements connector.
-
On the connector host computer, run the "Miradore connector for WithSecure Elements" scheduled task created by the installer, or run the WI_Elements_Connector.exe manually as an administrator.
-
Check WithSecure Elements connector logs for possible problems.
-
In Miradore Management Suite, navigate to "Operations > Connectors data > Antivirus view" and check that the antivirus and firewall data imported by the connector looks OK.
-
Installation using Windows installer
This connector can be installed to any 64-bit Windows computer with .NET framework 4.7.2 or newer installed. You can find the connector installer from: <Miradore server installation directory>\Connectors\WithSecure/WI_Elements_Connector_Setup.exe
-
Run "WI_Elements_Connector_Setup.exe" installer on the computer where you want to install the connector.
-
Set connector configurations. All fields must be filled before you can proceed with Next.
-
Host name/IP address: Host name or IP address of the Miradore Management Suite server. The connector will send the antivirus and firewall data to this server.
-
Instance name: You've set this during the installation of Miradore Management Suite. The default name for Miradore instances is "Miradore". This is needed because there can be multiple Miradore Management Suite instances running on a single Miradore server and the instance name is used to specify the desired instance.
-
HTTP(S) port: TCP/IP port that Miradore Management Suite server used for HTTP(S) traffic. By default, it is 80.
-
Use HTTPS: This option defined the protocol (HTTP/HTTPS) used to connect to the Miradore Management Suite server. The use of HTTPS is strongly recommended.
-
Ignore SSL errors: If checked, all SSL certificate errors are ignored.
-
Use proxy: If checked, the connector connects to the Miradore Management Suite server through a proxy server.
-
Proxy server: Host name or IP address of the proxy server.
-
Proxy port: Proxy server's port.
-
Proxy authentication method: Authentication method used by the proxy server. Available methods are: none, basic, digest, NTLM.
-
Proxy username: Username for the proxy server.
-
Proxy password: Password for the proxy server.
-
-
-
Set Windows Task Scheduler configurations
-
Add to Scheduled Task checkbox: If checked, WithSecure Elements connector task is added to Windows Scheduled Task and all fields must be filled before you can proceed with Next.
-
Start time: Connector is run daily at this time.
-
User account: Select to use SYSTEM account or give a username and password that is used to run this task.
-
[Domain\] Username: Scheduler will run task as it was started by this user. Add domain if needed.
-
Password and Retype password: User's password. Passwords must match.
-
WithSecure Elements connector configurator utility
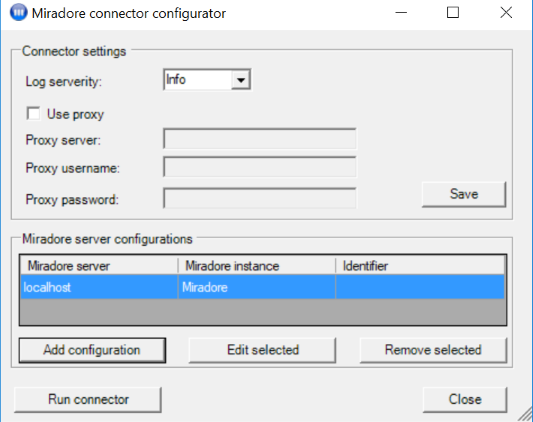
WithSecure Elements connector configurator utility can be used to add multiple configurations on one connector. This is very convenient when you have one server hosting multiple Miradore Management Suite instances and you like to use a single connector for all instances. You may also want to add multiple configurations if you managed several companies in one Miradore instance and those are separate organizations in WithSecure Elements.
You can find the WithSecure Elements connector configurator utility ("WI_Elements_Connector_Configurator.exe") from the connector's installation directory, which is usually C:\Program Files\Miradore\Connectors\WithSecureElements.
Adding connector configurations with the connector configurator
WithSecure Elements connector is installed with the Windows installer as instructed in the above paragraph Installation using Windows installer.
After that, it is possible to add additional connector configurations with the configurator utility as described below. Notice that the use of the connector configurator requires .NET 4.5 framework.
-
Run connector configurator ("WI_Elements_Connector_Configurator.exe") as administrator.
-
Click "Add configuration" in the connector configurator's user interface.
-
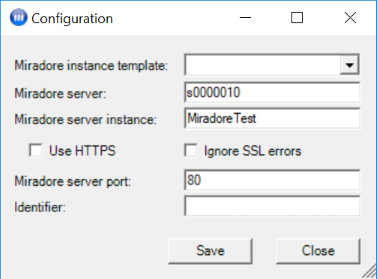
Enter the configuration settings for the new connector configuration. If you are configuring a new entry for an existing instance, you need to give a unique identifier for each new connector configuration item. Notice that you can use the "Miradore instance template" drop down menu to auto-fill configured Miradore server settings for the new connector configuration.
-
You may run the scheduled task for the connector using the "Run connector" button at the bottom of the connector configurator's user interface. If the scheduled task for Windows was not created during the installation of the connector, it will be created now and launched. After the task finishes, the connector item should appear to the Connectors table under System settings > Connectors in configured Miradore instances.
-
Remember to activate the added connector in Miradore instance by changing it's status from "Not authorized" to "Active".
Running WithSecure Elements connector
By default, the connector runs once in a day.
To run the connector manually, open Scheduled Tasks on the connector host, right-click on the "Miradore connector for WithSecure Elements" -task, and click "Run".
WithSecure Elements connector writes log every time it runs. It creates two files for logging, which are "WithSecureElements_connector.log" and "WithSecureElements_connector.old". The first mentioned has information about the last run and the latter archives old log files. Size of the WithSecureElements_connector.log is limited to 2 MB. Location of those files is defined in the registry (see registry settings below).
Logs can be also viewed in the user interface of Miradore Management Suite in "Administration > System settings > Connectors".
When checking the logs, you should keep in mind that there shouldn't be any warnings in the logs.
Windows Registry settings
WithSecure Elements connector specific registry key is:
HKEY_LOCAL_MACHINE\SOFTWARE\Miradore\Server\Connectors\WithSecureElements and rest of the values use this.
|
Value name |
Description |
Type |
Default value |
|
LogFilePath |
Path of the directory where log file is written. |
String |
%ProgramFiles%\Miradore\Connectors\WithSecureElements\Logs |
|
FileLogSeverity |
Can have four different values, which are: Debug, Info, Warning and Error. Those values mean the severity level of information that is written to the log file. At Debug level, all events are written to the log, whereas at the Error level, only error messages are written to the log. |
String |
Info |
Support for multiple instances
WithSecure Elements connector supports multiple Miradore instances.
Configuration requires adding a registry key for each connection to Miradore instance. The default connection is created by WithSecure Elements connector Windows installer and it's registry key is HKEY_LOCAL_MACHINE\SOFTWARE\Miradore\Server\Connectors\WithSecureElements\Network\0.
New connections to other Miradore Management Suite instances are configured by adding new registry keys under Network key (1,2, and so on). For setting values under the created key, see Network settings for connectors.
Miradore connector for WithSecure Elements
Inventory data gathered by the connector (page 11)
See also
Network settings for connectors
System settings for connectors