Microsoft Active Directory connector gathers information about users, computers, and groups from Active Directory in the current domain. At the connector settings, it is possible to configure what objects are imported from Microsoft Active Directory to Miradore Management Suite.
User objects that are removed from the Active Directory, will be set to Retired status in Miradore, seven days after they were removed from the AD.
This connector can be installed to any computer that belongs to domain,like to a Domain Controller, if required by firewall restrictions or such. Installer can be found from <Miradore server installation directory>\Connectors\Active Directory directory.
The connector must be a domain member
Account with read permissions to needed parts of Active Directory (typically any user account will have this)
The computer hosting the connector must be running on Windows 2000 or newer operating system
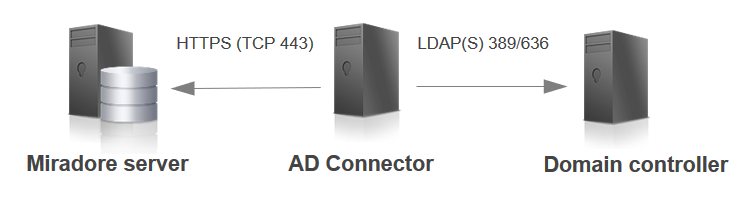
HTTPS (TCP 443) and LDAP (TCP 389) ports as depicted in the Network architecture picture
Correct SSL certificate must be available in rootCerts.pem file on the connector's installation directory if HTTPS connection method is enabled from Miradore system settings
Install AD connector to target computer. See Installation using Windows Installer below.
Run AD connector. See Running AD connector below.
After first run, AD connector registers itself into instance and creates AD connector item in System settings > Connectors of the Miradore management console.
Check that the AD connector item exists. If the AD connector item is not created, AD connector has not been able to connect to instance. Check AD connector logs (see Logging below).
Configure AD connector.
Configure AD connector item in System settings > Connectors of the Miradore management console.
Test AD connector (optional).
Configure AD connector to skip sending output files in AD connector registry settings (see Windows Registry settings below).
Run AD connector.
Check connector logs and output files in the installation folder of the AD connector.
Configure AD connector to send output files in AD connector registry settings.
Run AD connector (optional).
Check AD connector logs and at instance.
After System task Import asset inventory information has run, check imported AD connector data in Operations > Connectors data > Active Directory.
Run ”AD_Connector_x64.msi” or ”AD_Connector_x86.msi” installer file.
Set connector configurations. All fields must be filled before Next button can be pressed.
![]()
![]() Installer configuration
Installer configuration
Miradore server name: Host name or IP-address of Miradore server. Collected data is sent to this server.
Miradore instance name: Many Miradore servers can run on same host. Instance name specifies the server. By default, server is installed with instance name "Miradore".
Miradore server port: TCP/IP port that Miradore server uses for HTTP(S) traffic. By default it is 80.
Use HTTPS: If checked, HTTPS protocol is used instead of HTTP. Miradore server must be configured to use HTTPS.
Ignore SSL errors: If checked, all SSL certificate errors are ignored.
Use proxy: If checked, connector uses proxy server to connect with Miradore server.
Proxy server: Host name or IP-address of proxy server.
Proxy port: Proxy server’s port
Proxy authentication method: Authentication method that proxy server uses. Available methods: none, basic, digest and NTLM
Proxy user name: User name for proxy server
Proxy password: Password for proxy server
Set Windows Task Scheduler configurations.
![]()
![]() Task Scheduler configurations
Task Scheduler configurations
Add to Scheduled Tasks checkbox: if checked, Miradore AD Connector task is added to Windows Scheduled Task and all fields must be filled before Next button can be pressed.
Start time: AD Connector is run daily at this time.
User account: Select to use SYSTEM account or give username and password that is used to run task.
[Domain\] User Name: Scheduler will run task as it was started by this user. Add domain if needed.
Password and Retype password: User’s password. Passwords must match.
Start and complete installation.
Miradore Active Directory connector configurator can be used to add multiple Active Directory connector configurations on one computer. One connector configuration per each Active Directory domain.
Miradore Active Directory connector configurator utility ("ad_connector_configurator.exe") was added to the connector installer in connector version 2.8.0. After the connector installation, the connector configurator utility can be found from the connector's installation directory.
Installation of the first Miradore Active Directory connector is performed using the Windows installer as instructed in "Installation using Windows installer". After that, it is possible to use the connector configurator utility to add additional connector configurations to the same computer as described below.
Connector configurator requires .NET 4.5 framework.
Run connector configurator ("ad_connector_configurator.exe") as administrator.
Click "Add configuration" in the conenctor configurator's user interface.
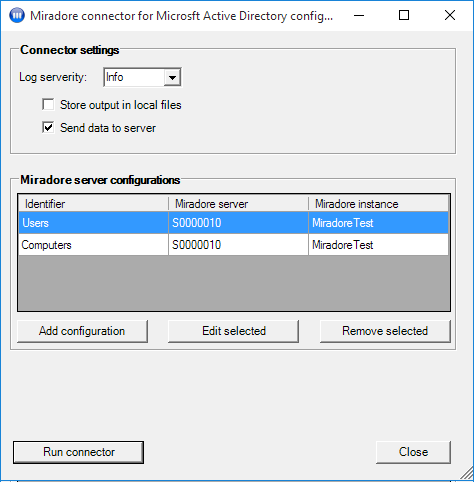
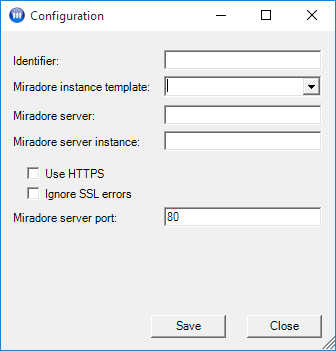
Enter the configuration settings for the new connector configuration. You need to give a unique identifier for each connector configuration item. Notice that you can use the "Miradore instance template" drop down menu to auto-fill previously configured Miradore server settings for the new connector configuration.
Run the added connector configuration using the "Run connector" button at the bottom of the connector configurator's user interface. After running, the connector item(s) should appear to "Administration > System settings > Connectors > Connectors" table in Miradore Management Suite.
Activate the added connector configuration(s) in Miradore Management Suite.
Open Scheduled Tasks
Start Menu -> All Programs -> Accessories -> System Tool -> Scheduled Tasks.
Right click Miradore AD connector and click Run.
AD connector writes log every time it is run. It creates two files for log: ad_connector.log and ad_connector.old. Ad_connector.log has information about last run and ad_connector.old archives old log files. Size of ad_connector.old is limited to 2MB. Location of those files is defined in registry (see Windows Registry settings below). Logs can also be viewed in System settings > Connectors in the Miradore management console.
Open AD connector log file.
Check that there are no errors or warnings in the log.
If it’s first time to run AD connector, there are two warnings in the log: ”Setting FileLogSeverity missing. Using default value Info.” and ”Setting LogFilePath missing. Using default value C:\Program Files\Miradore\Connectors\AD\Logs” You don’t have to care about them.
AD connector specific registry key is HKEY_LOCAL_MACHINE\SOFTWARE\Miradore\Server\Connectors\AD_Connector and rest of values use this.
|
Value name |
Description |
Type |
Default value |
|
LogFilePath |
Path of directory where log file is written. |
String |
C:\Program Files\Miradore\Connectors\AD\Logs |
|
FileLogSeverity |
Can have four different values: Debug, Info, Warning and Error. Those values mean severity level of information that is written to the log file. At Debug level it writes all log events and at Error level only error messages. |
String |
Info |
|
SkipFileSending |
AD connector removes output files after they have been sent to server. If SkipFileSending is set to 1, files are not sent and will not be removed. |
DWORD |
0 |
|
StoreFilesLocally |
It is possible to keep the output files for e.g. problem solving purposes. If StoreFilesLocally is set to 1, files are stored to disk. |
DWORD |
0 |
Registry key for network settings is HKEY_LOCAL_MACHINE\SOFTWARE\Miradore\Server\Connectors\AD_Connector\Network. See Network settings for connectors.
AD connector versions 2.6.1 and newer support multiple Miradore instances.
Configuration requires adding a registry key for each connection to Miradore instance. The default connection is created by AD connector Windows installer and its registry key is HKEY_LOCAL_MACHINE\SOFTWARE\Miradore\Server\Connectors\AD_Connector\Network\0.
New connections to other Miradore instances are configured by adding new registry keys under Network key (1, 2, etc.). For setting values under the created key, see Network settings for connectors.
SkipFileSending setting can be overridden connection specifically by defining SkipFileSending values in the registry key for network settings.
AD connector versions 2.7.0 and newer support customizable attributes fetched in an LDAP query.
The customizable attributes are: description, employeeID, givenName, initials, sn, displayName, department, mail, and telephoneNumber.
For example, if user's telephone number is stored in mobile attribute, you can define a custom attribute "telephoneNumber=mobile".
For more information about the customizable attributes and filtering options, check out the documentation for system settings of AD connector: AD connector item attributes.
Miradore can be configured to automatically generate Cost center items to Miradore for such cost centers that exist in Microsoft Active Directory, but which doesn't yet have a configuration item in Miradore. The setting for the auto-generation of cost center items can be found from:
Miradore system settings > Asset management > automatically generated items > Create items based on AD inventory > Cost centers. See System settings for asset management, for more details.
If collected data contains ';' characters, they are replaced by ':'.
Technical description
Miradore connector for Microsoft Active Directory
Additional info
![]()
![]() MSI Installer parameters
MSI Installer parameters
|
Following AD Connector specific parameters can be given to installer from command line.
|
![]()
![]() How to create Windows Scheduled Task manually in Windows Server
How to create Windows Scheduled Task manually in Windows Server
|
AD Connector should be added to Windows Scheduled tasks. This can be done in Scheduled Tasks menu.
|
See also
Mapping user's department from Microsoft AD to corresponding organization in Miradore
Network settings for connectors
System settings for connectors