3 Step IT connector imports and exports financial data between Miradore and 3 Step IT's asset system. In Miradore Management Suite the data will be shown on asset configuration item inventory and in financial data view.
3 Step IT connector must be installed on Windows platform.
3 Step IT connector must be enabled and configured via System settings.
3 Step IT connector requires .NET 4.6.2 framework.
3 Step IT connector requires an authorized connection to the Miradore server.
3 Step IT connector requires a Client ID and a Client secret provided to you by 3 Step IT.
Correct SSL certificate must be available in connector host computers Windows certificate store if HTTPS connection method is enabled from Miradore system settings
Asset configuration items can be either leased or owned in 3 Step IT and Miradore Management Suite. The asset data for owned assets is not imported to Miradore Management by default, but that can be enabled from the 3 Step IT connector item page with the "Import owned assets" field. If the option is disabled, only leased assets are imported to Miradore.
All asset data for leased assets is requested from 3 Step IT and the received data is saved to the database of Miradore Management Suite. You can filter the request by setting minimum contract starting and ending days. 3 Step IT devices are matched to Miradore assets using serial number. Preconfigured fields will be shown on asset's inventory and as a view under connectors Data -> Financial data.
Importing data from 3 Step IT to Miradore doesn't automatically update the asset configuration items' financial transactions if update is disabled from the connector settings. If update is disabled, the imported information is only shown as inventory information, as mentioned in the "Import" section.
However, in "Administration > System settings > Connectors > 3 Step IT connector", it is possible to define whether Miradore assets' current financial transaction information should be updated with the data from 3 Step IT. Using the "Update enabled" and "Update" attributes, you can configure which asset attributes should be updated with the imported data. When update is enabled, the asset configuration items' financial transactions are updated based on the data imported from 3 Step IT.
Export must be enabled and configured in System settings in the Miradore Management console before it can be used. When correctly configured, the connector will compare configured fields between Miradore and 3 Step IT and send updates to 3 Step IT for devices whose data is not up to date. Notice that there is also a separate field "Export owned assets" for configuring whether the connector is wanted to also export asset data of owned assets from Miradore Management Suite to 3 Step IT. If that option is disabled, only leased assets are exported from Miradore.
1. Run '3StepIT_Connector_setup.exe' installer file (located in Miradore server <install directory>\Connectors\3StepIT)
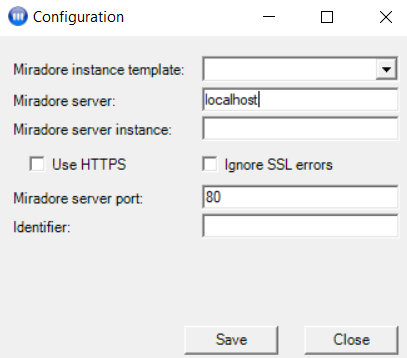
2. Set general 3StepIT connector connection and authentication settings. Miradore Server host name, instance and port must be provided before Next button can be pressed
1. Host name/IP address: Host name or IP-address of Miradore server. Collected data is sent to this server.
2. HTTP(S) port: TCP/IP port that Miradore server uses. By default it is 80.
3. Instance name: Many Miradore Servers can run on same host. Instance name specifies the server. By default, server is installed with instance name "Miradore".
4. Use HTTPS: This option defines protocol (HTTP/HTTPS) that is used when 3StepIT connector sends result file to the Miradore server.
5. Ignore SSL errors: If checked, all SSL certificate errors are ignored.
6. Use proxy: If checked, connector uses proxy server to connect with Miradore server.
7. Host name/IP address: Host name or IP-address of proxy server.
8. HTTP(S) port: Proxy server's port
9. Authentication method: Authentication method that proxy server uses. Available methods: None and Basic
10. Proxy user name: User name for proxy server
11. Proxy password: Password for proxy server
3. Set Windows Task Scheduler configurations
1. Add to Scheduled Tasks checkbox: if checked, Miradore 3StepIT connector task is added to Windows Scheduled Task and all fields must be filled before Next button can be pressed
2. Schedule: Select schedule concurrency: weekly or daily. If you select weekly, you can also select the day.
3. Start time: 3StepIT connector is run at this time.
4. [Domain\] User Name: Scheduler will run task as it was started by this user. Add domain if it is needed.
5. Password and Retype password: User's password. Passwords must match.
4. Set destination folder where 3StepIT connector will be installed and log folder where log file is written.
5. Start installation.
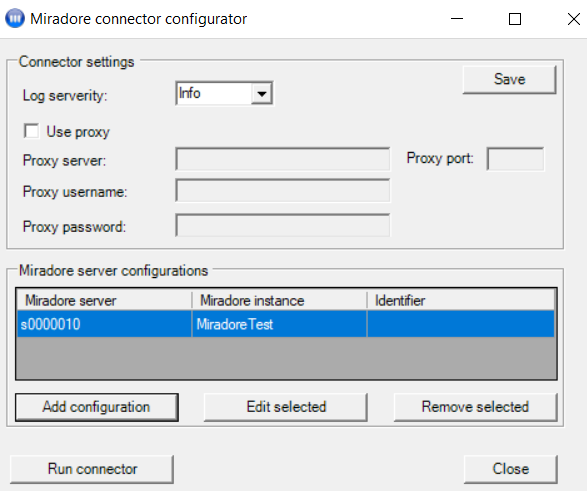
After installing the connector it is possible to add multiple configurations for it. Add new configurations with the connector configurator, if there is a need to handle multiple Miradore instances with a single connector.
1. Run connector configurator (3StepIT_Connector_configurator.exe) as administrator.
2. Press "Add configuration" to set up a new connector configuration.
3. Enter the configuration settings. If you are configuring a new entry for an existing instance, you need to give a unique identifier for each new configuration. You can use the "Miradore instance template" drop down menu to auto-fill configured Miradore server settings for the new configuration.
4. You can run the scheduled task for the connector using "Run connector" button of the connector configurator. Running the connector also creates the scheduled task for Windows if it's not yet configured during the connector installation. The connector item can be viewed from the instance (Miradore System settings >Connectors) after running the Windows task.
5. Activate the added connector from the instance, since by default it will have status "Not authorized" in Miradore Management Suite.
1. Navigate to Administration > System settings > Connectors in Miradore Management Console.
2. Open 3StepIT connector in the connectors table by clicking the host name where you installed the connector.
3. Authorize the connector by changing the status to Authorized.
4. Enter connection settings:
1. Url: 3StepIT's asset system url (https://api.3stepit.com/assetviewapi)
2. Use proxy: Use proxy server when connecting to the internet (Yes/No)
1. Proxy url: Proxy server's url
2. Proxy user: User name to be used to authenticate with the proxy server.
3. Proxy password: Password to be used to authenticate with the proxy server.
3. Client ID: Client ID assigned to you by 3StepIT.
4. Client secret: Client secret assigned to you by 3StepIT.
5. Enter import settings
1. Import owned assets (Yes/No): Defines whether the connector imports and updates asset data from 3 Step IT to Miradore also for the assets which are owned. Choose "No" if you only want to import asset data for leased assets.
2. Update Enabled (Yes/No): Select if attributes in Miradore are updated from 3 Step IT data
3. Updated attributes: If update is enabled, select which data gets inserted/updated to Miradore
1. Asset configuration > Financial transaction > Contract start and end date ( financial transaction)
2. Asset configuration > Financial transaction > Ending option (financial transaction, can be updated back to 3 Step IT)
3. Asset configuration > Financial transaction > Item price ( financial transaction)
4. Asset configuration > Financial transaction > Order reference (financial transaction)
5. Asset configuration > Financial transaction > Pickup location (financial transaction, can be updated back to 3 Step IT)
6. Contracts > Lease contracts: Creates missing contracts based on the imported asset's contract data and also adds contract number to financial transaction
-> Contract management must be enabled in System settings in order to see contract related attributes (options 1 and 6)
4. Import custom attributes: Select 3StepIT attributes to be imported to asset's custom attributes
5. Import date format: Select date format for the 3StepIT attributes if target custom attribute's type is datetime.
6. Import filters for contract starting and ending dates to restrict the query used when importing.
1. Contract started days ago: The maximum number of days since the contract's start date.
2. Contract ended days ago: The maximum number of days since the contract's end date.
Additional filters for the import can be configured at the computer which runs the connector. You can add filters through the registry by adding string values FilterxColumn, FilterxOperator, FilterxValue under the key Computer\HKEY_LOCAL_MACHINE\SOFTWARE\Miradore\Server\Connectors\3StepIT\Network\0 where x is the sequential number of the filter. You can define several filters in this way. Please see the examples below.
Example filter 1:
Filter1Column="productgroupname"
Filter1Operator="equal"
Filter1Value='Laptops','Desktops'
Example filter 2:
Filter2Column="displaysize"
Filter2Operator="equal"
Filter2Value="15.6"
Notice that when multiple filters are defined, the filters are combined with AND operator which means that the imported records must match with all the filters. You can, however, specify multiple matching values by separating the values with commas. For example, with these example filters, the import data would include laptops OR desktops whose display size is 15.6 inches.
The possible operators are: equal, notequal, lessorequal, moreorequal
For the possible columns and values, run the connector from the Command Prompt with the /debug parameter, and you will get an export.xml file which lists the possible columns and values. See the example command provided below.
C:\Program Files\Miradore\Connectors\3StepIT> 3StepIT_Connector.exe /debug
6. Enter export settings:
1. Export enabled (Yes/No): Enable/disable exporting attributes to 3 Step IT
2. Export owned assets (Yes/No): Defines whether the connector exports asset data from Miradore to 3 Step IT for owned assets. Choose "No" if you only wish to export asset data about leased assets.
3. Exported attributes: If export is enabled, add source/target attribute pairs to be included in the export
It is up to you to decide which Miradore attribute goes to which 3 step IT attribute
You can use the "Do not export empty values" option to choose whether you want the connector to replicate empty attribute values from Miradore to the target system. This option is unchecked by default, which means that the connector clears the value of an attribute in the target system if its value is empty in Miradore.
Custom names for fields named 'Extra ...' are shown in the selection popup only after first import
7. Save changes.
Technical description
Miradore connector for 3 Step IT Asset Management
Additional information
![]()
![]() Additional information about export
Additional information about export
|
List of Miradore attributes that can be exported
List of 3 Step IT attributes that can be updated in the export
|
See also
Network settings for connectors
System settings for connectors