Using private CA certificate with initial installation
This article instructs how Miradore can be configured to use a private certificate, issued by your own Certificate Authority (CA), for initial installations.
For initial installation to work properly, you will also need to rebuild your WinPE image(s).
After a successful initial installation, Miradore Client uses the private certificate for all communications between the installed computer and Miradore server.
Adding the certificate and configuring instance connection parameters
-
Export your root certificate (from your CA) as a Base64-encoded X.509 format and save it to your media master installation point at: Setup\_System\Miradore\rootCerts.pem
-
Ensure that your private CA certificate is listed as the first certificate in the rootCerts.pem file.
-
Make sure you take the certificate from the root level (not the certificate issued to Miradore server)
-
In case you are exporting the root certificate to .cer format, open the .cer file with notepad and copy-paste all contents of the file to rootCerts.pem file.
-
-
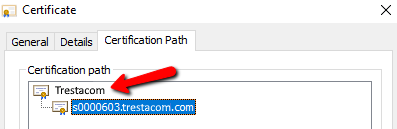
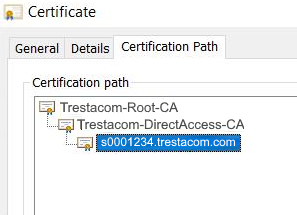
Notice that if the certification path contains one or more intermediate certificates (like on the picture below), you need to export the entire certificate chain, except the server certificate, and add also the intermediate certificates to the pem file.
-
Also in this case, copy the contents from all .cer files to the rootCerts.pem file.
-
-
Modify correct instance values to "Setup\_System\Miradore\MDVariables.cmd" and set IGNORESSLERRORS=0
-
Check also that SSL is enabled: MDPORT=443 (default) and USESSL=1
-
Please notice that these settings might be also overwritten by DHCP settings
-
Rebuilding the WinPE image
1. Make sure you have downloaded the latest version of the English version of Windows Assessment and Deployment Kit (ADK) for Windows 10 from the Microsoft's website. Download also the Windows PE add-on for the ADK.
2. Make sure you don't have any previous versions of these components installed. If you do, uninstall the older versions before installing the latest versions.
3. Install the Windows ADK to your computer. Make sure to install the "Deployment Tools" feature when running the installer. Install also the WinPE add-on.
4. Open Command Prompt (Run as administrator).
- The commands in this article may not work in Windows PowerShell, because they are examples for the Windows Command Prompt. If you want to run the commands in PowerShell, you need to modify the commands. If you need help with running the commands in PowerShell, please contact to Miradore support (support@miradore.com).
5. Map main installation point share to S: drive:
net use S: \\<server>\setup$<instance>
6.Go to S:\_system\_start\disks:
cd /d S:\_system\_start\disks
7. Create PE image using Miradore script. This script will create PE structures under c:\WinPE folder and copy the customized images to Miradore network boot folder. You can run CreatePE with argument /? to see the supported switches.
CreatePE.cmd
8.If you need to add drivers to the image:
Create C:\WinPE\drivers\x86 or C:\WinPE\drivers\amd64
Copy drivers to the folder
Recreate the image(s) by following steps 5-7
Relates to
See also
Windows client communication certificate